Pages

Friday, July 21, 2006

Got game! A Gavbot tests its mettle

I'd noted in passing having played C&C:A already when I wrote up my thoughts on the production, analysis of the new rules, and my first impressions of play, which had been enriched by those recent games with Badger. Those first games had been against Gav, me old mucker from the committee and the early days in the gaming ecommunity (when he went by the Gavbot handle). Checking at the BoardGameGeek C&C:A forum last week I got a serious hankering to get some more games in. Gav filled the bill.

Command and Colours: Ancients

"Hannibal? Crossed the Alps?! Hannibal..."
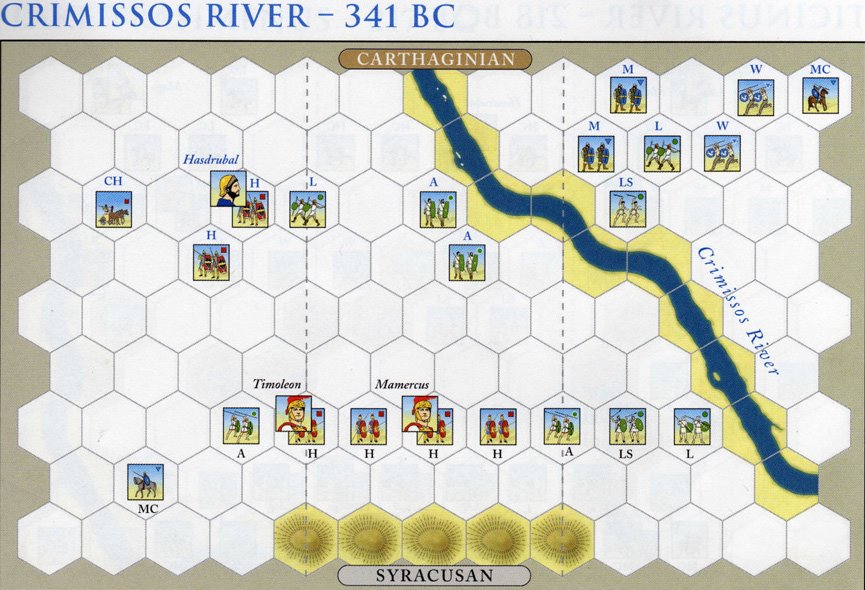
We set to C&C:A with a will then. Akragas and Crimissos River under our belts from before we headed straight for 218 BC and Ticinus River. 218 BC? Ah, this time Hannibal himself versus the Roman legions proper! Erm, not quite...

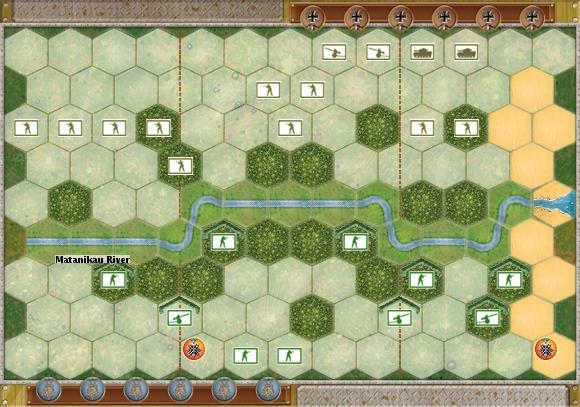
Just look at all that cavalry! I vividly remember my immediate instinct the first time I had that much of an all-cavalry army in front of me- line them all up and charge! Gav got to ride out as the Carthaginians first this time though. I, as ever sought consolation- in the lessons I learned about how to handle all that heavy cavalry (HC).

Expecting light cavalry (LC) en masse to do more than just skirmish, I was still shocked by the impact of the 2 wings of Carthaginian light cavalry. Their hit and run attacks separated my units, they massed quickly for exploitation, and their pesky evasion gave them surprising staying power. They ran me ragged and eventually won Gav the game, though it was a close fight.

For my part I'd decided that I needed to open passage to my cavalry through the centre. Fearing all that light cavalry I saw the chance to secure my right against the Ticinus. I didn't get off scot-free pulling this off, but it did leave me where I wanted. Unfortunately I'd been holding a counter-attack handy on the left, which I rashly chose to launch when it'd've been wiser to regroup to the centre. I ended up strung out and Gav was able to mop up a few units to sneak his win.

Playing the Carthaginians in my turn, I knew that it was vital to get the heavy cavalry moving quickly. Otherwise they'd simply get left behind leaving the actual fighting to the lights, as had happened to Gav. So I set out with all due haste to swing them to the open flank, screened by the lights. Hasdrubal's heavy cavalry in place, reformed, and thundering up my right, I took Marhurbal's screening Numibian horse and whipped them out, line across the centre and charged with them. The Roman centre thus effectively pinned by this brilliant manoeuvre, Hasdrubal ran his heavies all the way up the right wing, and was working his way back down the centre when it was all over. A satisfyingly crushing victory!

Lake Trasimenus
The Carthaginian cavarly having proved their worth at the Ticinus River Gav and I were game for more, so off we headed to Lake Trasiemenus, the following year. Hannibal makes his appearance at last!

Gav lucked-in by drawing the Carthaginians, leaving me to play the Romans under the leadership of the "vain and incompetent patrician," Consul Gaius Flaminius. Outnumbered, my army's right wing split off by impassable hills, and Flaminius' own cohort caught with its back to the Lake Trasimenus, I certainly felt that Flaminius utterly deserved to be remembered in such unflattering terms!

I didn't have many options available to me, starting as I did with a 2-card hand that would build up to 4 in a couple of turns. Realising that I just had to get Flaminius' cohort's backs off the banks of Lake Trasimenus, I decided to aim to engage the Carthaginians in the defile, in the hope that I might be able to coordinate an attack between my centre and my right. This all started off rather nicely with a bit of 'Inspired Centre Leadership'- an apt riposte to Flaminius' unflattering reputation I felt.

It mattered not a jot. The Carthaginian cavalry swept in from my left. Flaminius' cohort died in droves as they were pushed back into Lake Trasimenus. Then they turned on my left wing, and it was soon all over. A victory every bit as crushing as my own splendid day at the Ticinus River only the year before.

1-2
Gurns!

Memoir'44

Guadalcanal- the Slopes of Mount Austen
Enthused by our visit to ancient times, Gav and I opted to head for the Pacific Theatre so that Gav- who's already played some M44- could get a taste of the Japanese. Random scenario selection left us paying a visit to Guadalcanal in January 1943. The Americans were trying to secure the very same Henderson field my attempts which to capture had cost the Japanese so much blood when I'd led them against Badger's USMC only recently.

We played this scenario twice, swapping sides in the traditional manner. The Japanese lost each time. The Japanese faced several key problems in this scenario
  • they are on the defensive, which plays against their strengths
  • they are heavily outnumbered
  • the USMC have lots of artillery.
Playing the Japanese first Gav had a hard time as my experienced USMC units rained down fire in the inevitable artillery duel, and to whittle away at the Japanese units to deprive them of their crucial close combat ability. It wasn't long before the Japanese line was decimated. Gav gamely pulled back the remnants from 'Gifu' and 'Seahorse' and regrouped so as not to just give me the game. But there was little he could do and my USMC just closed in from all sides and seized victory.

The main difference in the 2nd game was that I could see the folly of just standing and fighting. So my plan was to abandon 'Gifu' and pull those troops back to hold the centre, while everything else would attack the American right. I made some progress in this- including, IIRC, successfully breaking through to destroy the US artillery unit on their right- but in the end the USMC's superior numbers and mobility won the day.

Wake Island
Plunging-in to Guadalcanal like this had been a harsh introduction to the Japanese for Gav, so we turned the pages of history back to December 23rd, 1941 and the Japanese invasion of Wake Island.

The purpose of this game being to give Gav a taste of why I had been so singing the praises of the Japanese in M44, he naturally enough came storming up those beaches. I made the best fist I could at figuring out the proper tactics for a US win, but to no avail. Still, the point had been made, and Gav could see why I had likened the Japanese in M44 to rampaging Ork mobs in 40K!

Breakout at Klin
Both still full of fight and with Gav eager to see more of the new M44 in action, there was nowhere else to go but the Russian Front. Gav again agreed to plunge in blindly, so another random selection took us to a German breakout operation, part of their regroupment after Operation Typhoon- their attack on Moscow in 1941- had stalled in the winter snows.

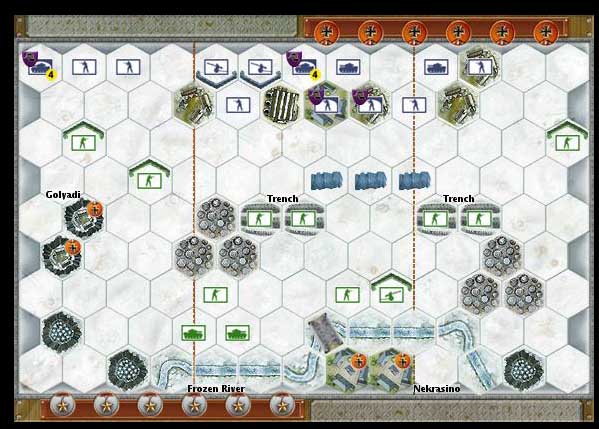
Drawing the Russians, Gav had to contend with both the Russian command rules and the Blitz rules. For my part I had a very strong force with a couple of combat engineer units. These were to prove decisive.

Faced with overwhelming force on his left, Gav did the sensible thing, pulling his covering units back towards Golyadi. Meanwhile I decided nothing ventured, and launched my combat engineers at the trenches. The fighting was bitter, but the engineers' special abilities made them deadly in close assault and they'd soon secured the central trenches. My victory wasn't long in coming, and it was pretty decisive.

3-4
More gurning! (But I found consolation in my handling of those Panzers at Klin, heh!)

Ivanhoe
With the hour well-advanced it was time for something quicker and dirtier even than M44 to round-off the session. So off to the medieval field of honour it was for another bash at this classic little game of tournament combat by Reiner Knizia.

The games went nip and tuck until it was 2 each. What I remember most about those games is the number of times I went in with a lance looking for final victory only to loose. So I was pretty pleased when I won the final game with an irresistible mounted charge. Gav asked afterwards why I hadn't just slapped all my purple cards down to claim an immediate victory. Experience has taught me that this can be a dangerous tactic, although there are surely times when it is absolutely the right thing to do. That last game was undoubtedly one of those times, but I guess I was playing my hand cautiously after having lost so often at this very same point in the previous games!

6-6
A satifying hard-fought draw. (But I was still master-at-arms and panzer-leader supreme! Mwah hah, etc!

Wednesday, July 19, 2006

News

The Black Library
- long-awaited Gotrek and Felix omnibus recently in!
William King's "...flagship fantasy series is collected together in a stunning new omnibus edition. This compilation collects the first three Gotrek and Felix novels in one softback volume."
Classic Old World adventure has never been better value! Ideal for holidays and gifts... ;)

Black Industries
- BI announce 40KRP launch products
"Earlier this year, BlackIndustries announced the launch of the eagerly anticipated Dark Heresy: The Warhammer 40,000 RPG (40KRP)! Now, we’re very excited to reveal the details of the first releases in this trilogy of 40KRP games. The first, being a game of investigation, is the ideal introduction to the dark and gothic 41st Millennium."
A familiar initial release slate with the core rules, GM's screen, character pack and an adventure anthology. Enough to pique existing interest to the level of active anticipation!

Tuesday, July 18, 2006

Memoir'44: completing the set #2

Pacific Theatre

Just as with the EF expansion the Pacific Theatre (PF) expansion provides a whole new army for the game- the Japanese naturally enough, complete with the rules to add it to the game. The models for the new army are very pretty. The armour models in particular are really rather cute. A strange thing to say about tank models, but the Japanese tank models are quite diminutive compared to those of the other armies. The artillery models too look very nice, but their design suffers again from a flimsiness I'd've preferred not to see. There were other guns in the Japanese armoury which could've been represented without this problem. So why did DoW choose to go with a design that would inevitably recreate the single complaint aimed at the production of the basic game? I really can't say.

As with the EF expansion the PF set provides rules for the armies fighting in the theatre- the Japanese and the US marines in this case. There are also rules for night fighting as well as the expected new terrain, medals, obstacles, and unit badges.

New rules
I've already referred to the Japanese and US marines' new special rules in the write-up of my recent games with Badger. I have to say that I really like these new rules. The extra card for the US marines is a simple addition colourfully reflecting the marines as they'd like to see themselves for sure. As to how authentic it is I really can't say. The marines certainly didn't enjoy any similar advantages in Up Front, the only other game in which I've seen the USMC in action with any regularity. All the same, I believe that the true measure of the USMC 'Gung-ho!' rules in the M44 PT expansion is that without them the USMC would probably have little chance against the Japanese.

The Japanese special rules are great fun. Japanese infantry must always ignore the first flag rolled against them, can move 2 and battle if they are entering close assault, and roll an extra dice in close assault with any unit that is at full strength. These rules neatly and simply recreate the implacable human waves for which the Japanese were infamous. In general the Japanese can close faster and hit harder in close assault than any other force in the game. This is a splendid capability to have at your disposal!

In addition the Japanese special rules have a serious impact on overall tactics. Confronted by a line of Japanese units a USMC player faces a difficult choice: should he concentrate fire to kill off each unit as is normally the smart tactic; or should he instead spread fire to pick off that first model from as many units as possible, thus depriving the Japanese of those bonus close assault dice? This choice makes facing the Japanese doubly ennervating for the marine player.

Great stuff!

The night-fighting rules are admirably simple. Visibility under night-fighting conditions starts off at 1 hex. Thereafter, at the start of each of their turns, the US player rolls 4 dice, with each star increasing the visibility range by 1. It is the uncertainty that is the nice touch here: you might decide to risk a mad dash across the open field under cover of the darkness, only for 3 or 4 stars to be rolled so that your troops end up dangerously exposed. These rules are also suitable for tweaking, by varying the number of dice thrown, or by allowing the Axis player to roll the dice so that they enjoy the first chance to take advantage of the rising sun.

New terrain tiles
Repeating terrain types already seen in the TP and EF expansions, the PT expansion also adds: caves- on mountains and hills, paddy fields and fish ponds, field hosptials and HQ/supply tents, jungles, a pier, and beaches and a river mouth. Some of these are familiar terrain types but expand the options available to the scenario designer, eg. you can have broader beaches now. Others are types whose rules are familiar but which are themed for the Pacific theatre. Still others are quite new.

The most striking new terrain type are the caves. Providing the best cover in the game, caves are usable only by the Japanese, who will be incredibly difficult to shift from these prime defensive positions: attacks will be on 1 dice barring Tactics cards; infantry will have to be at 1 hex range to get their attacks in at all; and the Japanese will only be retreating if hit by the 'Air Power' or 'Bombard' cards. And to top it all, the Japanese can move freely from any cave hex to any other unoccupied cave hex, no matter where it is on the board. Fortunately the Allies can seal caves, but this is a pretty hit or miss affair that could easily leave a unit exposed to Japanese counter attacks.

All-in-all then I would expect that scenarios involving caves are going to prove a real grind for the USMC player.

Jungles are the other major new terrain type the PT expansion introduces. These are essentially the same as woods, with the minor but significant change that units entering a jungle from an adjacent hex may still battle that turn. This is another rule that I find a bit perplexing. The only rationale I can imagine for this rule is that jungles lack the same dense undergrowth that is assumed to be part of woods. This is counter-intuitive at first sight (and is certainly not how jungles work in Up Front), but I can think of 2 ways that this makes sense. First: palm trees and other similar jungle plant life have tall trunk without many side-branches lower down the trunk. Second: if jungles are defined by a dense canopy, then there would be less undergrowth because of insufficient light. With that in mind I guess the jungle rules might well make sense on reflection.

Field hosptials and HQ/supply tents are probably the most significant remaining new terrain types. One reason for this isn't great: the otherwise usually very thorough Mr. Borg has forgotten to define their cover effects. It doesn't take too much thought to decide that they'll count as Town/Village hexes, but it's an irritating point against someone whose rules-writing on M44 is normally so tight.

As for the rules themselves? Not unlike the oasis hex from the TP, field hospitals allow infantry units to regain lost figures. HQ/supply tents are a terrain feature which, if captured by your opponent, allows your opponent to draw a card at random from your hand, leaving you to play with a reduced hand until you recapture the HQ/supply tents. This is a nice wee rule, a neat interpretation- in game terms- of an obvious piece of cardplay. I would hope to see both of these rules being put to use in other ways by scenario designers.

New medals
A nice Japanese victory medal aside, there is nothing in the PT expansion that we haven't already seen elsewhere.

New obstacles
The new counter in this category that makes its appearance in the PT expansion is the warship. Warships in M44 can be either destroyers or aircraft carriers. Either way there are counters that lurk along the edge of the sea on the beach mapboard. Warships can move, but are effectively restricted to 1 hexrow on the basic beach mapboard. Offensively destroyers count as big guns, complete with extra range and the additional battle dice for zeroing-in. Aircraft carriers give access to air support, pieces and rules for which are to follow in an expansion M44 hope to release before the year is out.

Warships can be fired on too. They only suffer grenade hits, ignore the first flag, and require 3 hits to be removed for a victory medal. So while it would be possible to run your infantry down the beach to take pot shots at a warship, you'd have to be insane to try that particular tactic, and insanely lucky to succeed. It's more likely that artillery, air strikes and barrages would be used against warships. And, having experienced the power of big guns before, I would imagine them being used as often as possible against destroyers, which could prove a real pain!

New unit badges
Two new unit types make their appearance alongside the plethora of special forces badges: mobile artillery and flamethrowing tanks. Mobile artillery has all the firepower of artillery with the move and fire capability of infantry. This I must see! Flamethrowing tanks meanwhile never lose more than 1 dice due to terrain effects in close assault- another nice addition which I look forward to using in cityfight scenarios!

Conclusions

Overall the Eastern Front and the Pacific Theatre expansions are satisfying additions to the M44 game. It is often commented that M44- just like C&C:A- is more a game system than a mere game. This is very true, and, by the time you have the 3 expansion packs you will have almost everything you'd ever need to play battles from pretty much any theatre of land operations during WW2.

The range of available terrain types is very comprehensive, though perhaps not utterly exhaustive (it all depends on how you choose to define your terrain types I guess), something which can also be said for battlefield fortifications. Although complaints persist about the lack of differentiation of, say armour variants, M44's treatment of unit types is expanding nicely.

The additional rules for national variations in the EF and PT expansions are very nice too. As a long-time fan of Up Front I have to say that I feel that this is the area in which M44 remains at its weakest, resorting as it does simply to varying the size of the hand in any given scenario. The rules for the Japanese and the Russians have shown just how far it is possible to go in creating a distinctive feel for each nationality. I for one would love to see similar rules developed for the other nationalites too.

If I think that the EF and the PT are expansions to M44 that are worthwhile investments for fans of the game, I do still have some complaints. First and most seriously, the rules aren't as tightly written as are those of the basic game. Some crucial information is simply left out, while elsewhere explanations are perhaps more ambiguous than they need be. I know how difficult it is to write rules that are clear and comprehensive, and the M44 rulebook rates higher than most for me. It's just a bit of shame that the game's expansions aren't to quite the same high standard.

In a similar vein, I'm not 100% happy with the winter theming of the EF set. I mean, I can see that a winter board would be an obvious flipside to a desert board. And I can see the attraction of such boards to a game for which visual appeal is so important (I did buy the thing after all!). But the point is that there are several terrain tiles that appear only as winter-themed, or only as otherwise. It's a bit irritating to invest in the extra board for the sake of the look only for their to be potential scenario layouts in which the themes will clash.

But it has to be said that these are pretty minor complaints. They are certainly not complaints about anything that makes the expansions less than fully useful. No doubt FAQ and errata will be available from DoW soon enough. And could they be planning to respond to any serious demand to fill out the range of available terrain tiles with another expansion pack? Surely not!

A final note
Also worth noting for buyers of the basic M44 is that the PT expansion is the first expansion to come with a webcode. Registering this webcode on the DoW website will give you access to the save function of the online M44 scenario designer (because you'll already have registered the webcode that came with M44 naturally enough). You also get full functionality on the DoW forums (eg. you get a sig, PM's and so on). This 'player' status is still time-limited, although it might offer lifetime access to the fully-featured M44 scenario creator as you get, IIRC, when you enter webcodes from 2 copies of the basic game. I'll know soon enough I guess. ;)

Monday, July 17, 2006

News

Black Industries
- new WFRP fan materials at BI...
"... courtesy of Colin Chapman. These are split into two documents, the first of which takes a look at some of the careers available to the men and women of Kislev, including the noble Druzhina, Bear Tamers, Rangers and Winged Lancers."
Kislevite careers PDF? Just what this GM needS in his little Old World right now.
- a definite download to HD!

Memoir'44: completing the set #1

A satisfying pile of components

As I've already noted, recent trips to Static have netted me the Eastern Front and Pacific Theatre expansions for M44 to add to the Terrain Pack to complete my set of this favourite game of mine.

And what a set it is when you've got it all:
  • Command cards, battle dice, card holders and reference cards
  • 5 rulebooks, including 36 scenarios
  • 2 mapboards- giving beach, countryside, desert and winter maps
  • 4 complete armies, comprising infantry, tanks and artillery- American, German, Soviet, and Japanese
  • 198 double-sided terrain tiles
  • 36 obstacle pieces
  • 141 assorted counters for obstacles, unit badges, victory medals and other things too numerous to detail
  • the Commissar chip
This pile is going to cost you something in the region of £90, but it is certainly good value for money if you compare what you get for that sort of money if spent on other typical forms of amusement, eg. around 40 pints of beer, 18 trips to the cinema, 3 or 4 video games, or even 2 or 3 other boardgames. However you choose to add it up, the replay value of a complete set of M44 is sufficiently high to make it a worthwhile investment.

Meanwhile, what do the Eastern Front and Pacific Theatre bring to the M44 game?

The Eastern Front expansion

The most obvious new addition to the game in the Eastern Front (EF) expansion is the Russian army. This is lovely, without doubt the nicest army in the M44 set. The tank models in particular are delightfully chunky, and are my favourite models in the entire range. The artillery models too are solid pieces that don't suffer from the frailty that was a common complaint aimed at the artillery models in the basic set.

Beyond adding a new army, the M44's EF expansion follows the Terrain Pack (TP) in providing rules for new terrain tiles, new medals, new obstacles, and for new unit badges.

New rules
The new rules in the EF expansion are twofold- special Russian command rules, and Blitz rules.

The Russian command rules make use of the Commissar chip- it seems that Richard Borg can no more resist the colourful lure of the Commissars of the Red Army than can anyone else! This rule aims to represent the way that the Russian command structure discouraged initiative on the part of junior commanders, and is very simple to use: the Russian player must select the Command card to be played 1 turn in advance. This is a nice simple rule whose effects I can see being quite acute in those situations in which you are trying to set up a good use of cards such as Close Assault or Armoured Assault.

The Blitz rules are a fix to represent the superiority of German armoured units in the early war years. Under the Blitz rules Allied armour units may only move 2 hexes. In addition German players can use 'Recon 1' cards to call in airstrikes.

New terrain tiles
The terrain tiles in the EF expansion are all themed to match the winter board. Some of them are simply winter-themed versions of tiles from the basic set or from the TP. Others are brand new terrain types. The latter category includes trenches, city ruins, ravine, hill with forest or village, frozen river, and factory complex.

Each of the new terrain types has simple variations on the rules with which regular players will already be familiar. For example city ruins are based on the rules for towns/villages, with the additions that they are only accessible to infantry, who may ignore the first flag in addition to the normal rules. Among all the new terrain types, a favourite has to be frozen rivers. A frozen river is passable, unlike a regular river, but at a risk: you have to roll 2 dice when a unit enters a frozen river hex. For each star that comes up, the unit loses a model!

New medals
Most of the new medals in the EF expansion are either completely obvious, or repeat material from the TP. The one completely new rule is the rule for camouflage, which is a nice addition to the range of options available to scenario designers.

New obstacles
The new obstacles added are field bunkers and dragon's teeth. The field bunkers are simply bunkers which can be used by either side. Dragon's teeth are the concrete anti-tank obstacles with which many readers will be familiar. These are both perfectly sensible additions to the range of obstacles available in the game. My only quibble is that I can't really understand why dragon's teeth don't offer flag protection to infantry units- hedgehogs do after all. Perhaps the designer was looking to differentiate the 2 obstacle types, although whether or not this makes sense I don't know.

New unit badges
Some of the more interesting additions the EF expansion provides to M44 are the unit badges. The new unit badges are: snipers, combat engineers, cavalry, and Finnish ski troops.

The sniper rules give a neat take on this unit type which was important on the battlefield, but which you might immediately think would be difficult nicely to represent at the scale of M44. Combining rules from a variety of sources, snipers are an infantry unit which can: move 1 or 2 and battle, including when they enter terrain that would otherwise prohibit fire by an infantry unit (special forces and French resistance, respectively); retreat up to 3 hexes per flag (French resistance again); have 1 battle dice- not against armour, and not reduced by terrain- with a range of 5 hitting on a symbol, grenade, or star (air strikes), with flags counting as normal. Snipers in turn can be hit only by grenades.

So that's 1 dice killing an infantry model 2/3 of the time and an artillery model 1/3 of the time. Add in that range of 5 and I can forsee cries of frustration as snipers zip around the board picking-off your artillery or finishing-off weakened units!

Combat engineers are another nice addition, representing units with flamethrowers and other special equipment. They don't suffer battle-dice reduction in close assault for the opponents' terrain, can battle and clear wire at the same time, and can clear minefields. All of which are capabilities I already wish I'd had at my disposal in previous scenarios!

Cavalry work as regular infantry units with the move and fire capabilities of armour- move up to 3 hexes and battle, but with reduced firepower- 2/1 dice at 1/2 hexes, as opposed to regular infantry's 3/2/1 at 1/2/3. In addition they can advance and battle again after a close assault just like armour. These rules nicely place cavalry between infantry and armour in terms of firepower and mobilty.

Finnish ski troops are even better than cavalry. They enjoy the same option to move 3 and battle, but with 3/2 dice at 1/2 hexes, and they can still battle after entering terrain that would normally prohibit infantry from battling. In addition ski troops can retreat 3 hexes/flag instead of the normal 1. The one serious weakness these highly mobile troops suffer from is that they only have 3 models, making them that bit more fragile in an extended firefight.

That's it for the new contents of the EF expansion. I'll be back soon to take a look at the PT box. ;)

Saturday, July 15, 2006

Not news, but nice nonetheless

I don't play video games, no matter what kind or on which platform. I've nothing against them as such, it's just that they've almost completely passed me by for one reason or another. At the same time the WW2 tankie in me has long appreciated in a very practical way the truth of that old adage about the picture and the 1000 words. In my very earliest days as a Dungeon Master for example, I thought of collecting picture postcards of interesting terrain features to use as props in my adventures. And I can still remember how certain illustrations in the old AD&D books really fired my imagination about what I wanted from dungeon-bashing.

So I've long felt twinges of regret at how my utter ignorance of video games leaves me equally ignorant of some of the seminal imagery of our times from the very same genres in which I enjoy my pre-ICT adventures. Thank goodness then for the internet and screenshots.

All of which brings me to Mythic Entertainment's second attempt at a MMORG of GW's first trademark product- Warhammer Online: Age of Reckoning. Now I've got no interest whatsoever in this product. But I do like some of the screenshots.

I've downloaded nearly all of these. You can rest assured that my players will witness some of these sights in my games sooner or later.

Here's a great shot of an orc army camped outside a dwarfhold deep in the mountains. This picture really speaks for itself doesn't it? There's a whole adventure in that one picture, not to mention a really great prop- I'm sure players would find seeing that picture more impressive than almost any GM's description of that scene.

One of my PC's in my current WFRP game might actually have been spending some downtime working in something like this in the Wynd- the dwarfen district of Middenheim. Who knows? But it's a nice looking picture of a dwarfen smithy all the same.

And just so my players don't get the idea that I'm dropping subtle hints with all those dwarf pictures, here's an atmospheric view of an orc settlement in the forest. Again, can't you just imagine the impact of the use of that picture to announce an encounter in a roleplaying session?

While on the subject of images that might be inspirational to GM's, here's a thread on the Black Industry forums devoted to just that subject. I've already found some of the pictures of narrow streets to be useful in giving me a more concrete image of what the streets of Middenheim look like. Whether or not my players noticed any difference is not for me to say. ;)

Friday, July 14, 2006

Commands and Colours: Ancients- the Richard Borg engine rumbles on! #3

I've already looked at the components and production of C&C:A, and at the key rules changes relative to Memoir'44. So how to I think the latest addition to the Commands and Colours stable measures up to M44?

Very well indeed. My survey of the rules changes has already examined how these reflect the specific features of the ancient period and enforce appropriate tactics. Here I will try to pull all of those points together to give a sense of C&C:A's period flavour and overall gameplay. But first...
The gripe
I do have one complaint though. This is the rulebook. I was very impressed by the M44 rulebook. Sure its glossy full-colour pages were pretty to look at. More importantly, it was very well written. Richard Borg explained the workings of the game in a way that was admirably comprehensive while at the same time being a smooth read.

The C&C:A rulebook by contrast is a noticably more torturous read. Borg attempts to apply one of the strengths of his M44 rules writing- namely consistent use of terminology to establish cases and precedents without heavy cross-referencing or extensive notation of exceptions. Unfortunately he just doesn't pull this off nearly so well, giving us a rulebook some of whose jargon and structure feels distinctly forced to this reader. I am left with the impression of a rulebook that makes the game harder to understand than it need be.

The contents of the FAQ already available confirms to my satisfaction that this is not just my personal experience. I have to say that I believe this is where GMT's economic model let them down on this project. The rulebook smacks of having been through too few iterations. I can only assume that GMT just couldn't afford more, one way or another. And so we get a rulebook which- as I am not alone in believing (scroll down and check out Kevin Duke's 2nd post)- smacks just a bit too much of the 'we all know what it means' syndrome that can arise when a ruleset doesn't get enough blind testing.

This might seem a bit of a peevish gripe, especially in these internet days when FAQ- and often the designers themselves- are so easily available that any mistakes or misunderstandings can quickly be clarified. All the same I can't help feel that a game as essentially simple as C&C:A is undermined by a rulebook that fails to make some of its key rules as crystal clear to read and grasp as they are undoubtedly easy to play.

The glories
One very striking rule change in C&C:A is to retreats, with units retreating their full movement allowance per flag- instead of 1 hex/flag as in M44. The way that this rule makes units that move faster flee faster is an immediate insight into a key feature of the ancient battlefield: it was much smaller than its WW2 counterpart. Even if the forces deployed in a C&C:A scenario were numerically equivalent to those in an M44 scenario, the nature of warfare in the 2 epochs was so different that the ancient army would still occupy a much smaller space, for reasons I need not rehearse here.

The support and the leader rules also give a sense of this much more confined battlefield. The scale of M44 is such that units in adjacent hexes aren't necessarily in sufficiently close proximity for any morale benefit to result. Adjacent units in C&C:A on the other hand are almost shoulder to shoulder, so the support rules make perfect sense. Likewise the ability of leaders to provide the leader hit bonus in close combat to adjacent units shows how much smaller the ancient battlefield is.

No expert on the period as I have already confessed, I'm still pretty sure that-sieges excepted- ancient battles as represented in C&C:A were always fought out in the course of a single day. By contrast it's not difficult to imagine some M44 scenarios representing several days of action. This compression in time in C&C:A is layered nicely on top of the confined space through the impact of the unit types and the adjustments to close combat, particularly with battling back.

In M44, tactics typically revolve around the use of terrain- to provide cover for your units laying down preparatory fire on the enemy, and to screen the advance of your assault force who will be closing-in to gain your objectives. The effect of terrain is therefore a tendency to extend the battle in space and time as players maneouvre to find a decisive local advantage before launching a major assault.

The absence of terrain on the typical C&C:A battlefield obviously precludes this style of play. Add in the effects of the support rule, and the various command cards whose effects are based on ordering units which are adjacent to each other- 13 of the 60 cards; and the preparatory phase of a game of C&C:A typically involves manoeuvres to pull your battleline into order before launching it at the chosen section of the enemy's line. This marshalling of your battleline will often be accompanied by cavalry skirmishing on your flanks, or by bringing up missile troops to lay down harassing fire.

Awkward enough already due to the practicalities of organising 2 different kinds of maneouvre- skirmishing and line formation/advance- under the vagaries of cardplay, this process is rendered even more fiddly by the slow movement rate of what will typically be your key assault troops- those heavy or medium infantry moving at that painfully slow slog of 1 hex/turn. And as if this wasn't taxing enough, you'll probably be under harassing fire from the enemy's skirmishers, or even from a more solid line of missile-armed troops.

Open terrain; unwieldy formations; slow troops: in combination the effect of these is that once you've commited to a line of advance, you're unlikely to be able to do much to change it before your units make contact with the enemy. And so C&C:A seems to me to place an even higher priority than does M44 on quickly grasping the potential of your hand, forming a plan, adjusting for that plan, and just getting stuck in. Otherwise your opponent will get to deliver a possibly decisive first charge.

If the C&C:A's depiction of the basic elements of its period seems to drive the action forward in a way that gives a nice feel for the dynamics of ancient warfare relative to those of M44, the revisions to the battle rules mean that the clash of arms towards which the action is so driven is similarly liable to be more decisive.

In the first instance there is simply the sheer number of battle dice you are liable to be throwing in close combat- which will usually be 3 or more for your key assault units (as opposed to a far more likely 2 dice in M44). Medium and heavy units in particular- with their 4 and 5 dice- have the chance of wiping out full-strength foot units in a single good attack, something which simply cannot be done in M44. Good use of skirmishers' missile attacks, proper concentration of force and skillful use of leaders, plus the prospects of battling again if you destroy or push back an enemy unit, only increase the chance that a timely first strike can utterly crush the enemy line before they can respond.

The battling back rules too ensure that close combat, once joined, will typically be more deadly than in M44. I have read complaints that this rule doesn't exist in M44. I believe this to be misguided. Close combat in C&C:A is precisely that: man-to-man combat with hand weapons. Close assault in M44 can be that, but is more likely to be a firefight at the short ranges at which rifles and SMG's can be brought to bear at full effect.

The battling back rules in C&C:A therefore nicely represent the compression in space and time inherent in game's period, making each and every close combat inevitably a risk that you will immediately suffer serious losses. And they will mean that more often than not, close combat, once joined, will be short and bloody.

Of course the evasion rules offer the prospect to pull back in the face of such potentially devestating attacks. This can lead to some of the 'cat-and-mouse' sort of play that is more common in M44. But even if you do successfully evade you face the prospect of exposing your flanks, or of opening holes in your lines thus depriving key units of their support. Either of these outcomes could easily prove more dangerous to your army as a whole than the fate the evading unit(s) sought to avoid.

Conclusions
Overall then C&C:A is a splendid addition to the available range of Commands and Colours games. Its rules are familiar to those who know M44, and are thus easy to grasp despite the extra layers of detail, and yet the game feels completely different in play. This is a very important point it seems to me. The worst thing that could've happened with this game is that it just turned out to be M44 with the serial numbers filed off. Instead we have a game which shows us just how elegant Richard Borg's core system really is.

I mean to say I have read several comments here and there on the net that C&C:A is more realistic than M44. This is usually put down to the greater range of unit types. I would have to agree with this to some extent. As much as I admire M44's depiction of the relative strengths and weaknesses of the different arms of service on the WW2 battlefield, it can hardly be denied that the game would be improved, say, by simple rules differentiating between light, medium and heavy armour. Regular readers will already know my high opinion of the merits of M44 regardless of these issues. (See last year's 4-part 'A rash of enthusiasm...' for M44: #1, #2, #3, #4.) With C&C:A at our disposal it is easy to imagine these details being addressed in M44.

This is not a subject I want to get into any further here, because it seems to me to miss the crucial point of comparison in any case. Borg's Commands and Colours system isn't about the meticulous rendition of minutae beloved by generations of grognards. Rather it is about the authentic evocation of the atmosphere, general dynamic and specific tactical problems of a given period of warfare in a format enabling fast and fluid play and focussed on putting the players right in the generals' seats. In this respect C&C:A enjoys full marks exactly as does its sister game M44.

Final note
Just like M44, C&C:A has been so successful that it is quickly being expanded. Expansion Pack 1: The Greeks & Eastern Kingdoms apparently reached its preorder target under GMT's Project 500 scheme faster than any game ever. It is due out in the next month or two. And Expansion Pack 2: Imperial Rome and The Barbarians is ratcheting-up its pre-orders quickly enough that we can be sure it will be released with all the haste GMT can muster.

Fans of Borg's great design have a lot to look forward to in then. ;)

Wednesday, July 12, 2006

Meanwhile...

Almost a second GM'ing landmark

Thinking back to the last WFRP game after writing it up, I was struck by a shocking thought: I had almost achieved my first ever TPK- Total Party Kill for the uninitiated. With 2 down out of 3 I got a lot closer than when I took down 3 of 5 with the outlaw ambush in the Drakwald. And that episode had been shocking enough.

Yes, I know that percentage-wise the difference is a pretty insignificant 6.666 recurring per cent. But that would be a use of statistics to mask the fact that I only needed to kill 1 more PC in that sewer, meaning that I was indeed that much closer to the TPK. All the more so considering that the one PC who did survive is the least combat competent in the party.

It's not as if I was actually trying to kill anyone. Alane and Berthold were just foolish enough to follow Seigfried's rash descent into the sewer, and everyone was stupid enough to do it without proper preparation. Hopefully that'll be 2 lessons well learned.

The TPK would've been really easy too. Fortunately for Alane I'd already judged that the party of Skaven in the sewer had retreated in haste after the PC's had crushed the scouting party which had attacked in Morrspark when Snikkit Blackblade decided to put personal revenge before his mission. Yes, I've recently picked up Children of the Horned Rat and just couldn't resist adding traditional Skaven infighting and bumbling minions to my plans to make use of an old loose end.

Of course, one of the reasons the Skaven in the sewers retreated was to let the PC's get a look at the chewed-over carcass that was another of the loose ends that was in the set-up for the session (oops, there goes that 4th wall- sorry Andy!). But in any event, I decided thereafter that the vile ratmen's main interest was in retrieving what, to them, was a valuable resource.

So Alane's escape made sense. Even so, it did leave me wondering if I was letting her off too lightly. Ever since the shock of taking out 3 PC's in that ambush I've been very leery of killing off anyone. I've found myself wondering if I'm just too soft to run WFRP quite as grim and perilous as it really ought to be. Maybe a TPK is a crucial initiation that every WFRP GM has to go through? I don't know, but The Madness of Father Ranulf might've been a bit of a tonic in that respect!

In any event, the mood was strangely lighthearted afterwards. Losing fate points that you'd only just gained can do that I guess. Andy noted how I seem to have a habit of 'killing' PC's in side stories instead of major encounters. I promise to do better next time... Mwah hah, etc! ;)

History to download again

So gnome does it again! After his link to a free download of White Dwarf #1, he has gone and given us a link to the venerable stunty's only serious contender for the title of Most Venerable in the hallowed ranks of rpg publications, namely The Dragon #1. Interesting to note that The Dragon beat the White Dwarf to the shelves by a mere 12 months.

Of particular note is the article by Fritz Leiber about Lankhmar, the setting for his popular Fafhrd and the Gray Mouser stories. Also interesting is the article about Royal Armies of the Hyborean Age featuring Lin Carter in the co-author credits. Oh, and there's that psychedelic cover. Noteworthy? Maybe not, but a momento of a bygone age for sure.

Another good one from the gnome then.

Tuesday, July 11, 2006

ENnie Nominations 2006

As I write I've just checked out Matt Forbeck's blog as I do regularly, to find the news that this year's ENnie Awards nominations are up.

Ignorant of the ENies last year (shameful admission, eh?!), I first found out about them when the news broke that Black Industries' WFRP2 and the Old World Bestiary had taken 3 golds. I was pleased to see such success on the part of 2 products that I liked and which had brought me back into regular roleplaying. So I've decided to cast my votes this year.

Looking through the categories I see that Green Ronin's superhero rpg Mutants & Masterminds 2e is very well represented, with 9 nominations in 8 of the 16 categories. M&M 2e really impressed me when I got my copy last year, and the product line went straight onto my 'buy on sight' list. There is only 1 category in which GR's M&M won't be getting my vote- Best Interior Art for the Mastermind's Manual. Sure, there are some nice illustrations in that book, but there are easily enough that are indifferent or worse that I just can't cast a vote for this book in that category. In fact I doubt I could vote for the Mastermind's Manual at all if it wasn't for its lovely cover.

The core rules though are really good, and easy to vote for as often as possible. And the M&M campaign setting- Freedom City; well this is simply the single best setting product I have ever owned. So votes for this are a shoe-in too.

Black Industries get a look-in again this year, with their Realms of Sorcery nominated for Best Supplement. There are no M&M products nominated in this category, so that's another easy vote for me.

I will have to choose between Green Ronin and Black Industries when it comes to the Fans' Choice: Best Publisher category. I have enjoyed the most use and most entertainment from BI's products in the past year, and am looking forward to still more in the future. With M&M and True20 though GR have produced the products whose rules excite me most, and which I am most interested in using if I'm not GM'ing WFRP. The Old World or the new? Hmm.

Finally, on the 'Oh, dear me- NO!' front, I note that Hero Games' Pulp HERO garnered 2 nominations. One was Best Product, the other was Best Writing: "Awarded for the book containing the best prose and descriptive text (ie."cream" or “fluff”)." Erm, let's just say that I have a bee in my bonnet about this book, and really don't believe it deserves to win in either category. ;)

Monday, July 10, 2006

Got game- a badger strikes again!

So the inimitable Badger came round last Friday. After big plates of pasta and the mandatory BBC Radio 4 Friday night comedy slot- Armando Iannucci's Charm Offensive at the moment- we settled down to some serious gaming. Badger was delighted to see that I'd got the complete set of Memoir'44 and the new Commands and Colours: Ancients, so evening of trying out new stuff was in store for us both.

Commands and Colours: Ancients

Battle of Akragas
We got right down to business with some games of this all-new version of the Borg system with which we are both already so familiar. Starting at the beginning- as you do- we played a couple of games of 'Battle of Akragas' first, with Badger playing the Carthagians against my Syracusans. (You can click on the pictures to see larger versions btw.)

My strategy in each game was the same: form up my Heavy Infantry (H) into a single line and aim for the Carthaginian left. I had 2 reasons for this:
  • it is the weaker wing of the Carthaginian army
  • my 2 Auxilia (A) units gave me better reserves on that flank.
The first game was noteworthy first of all for my forgetting altogether to set up my Light Bow units (LB), something I didn't notice until the game was done. D'oh! And second for my mistaken belief that the Medium Cavalry (MC) on my right was instead a Light Cavalry unit (LC) like that on my left- an error that resulted in an unexpected quick early kill for Badger. Double d'oh! Bemoaning my fate I noted that I was likely to suffer for having given away a free victory banner so early in the game. Events were to prove me correct.

Anyhoo, I had a good hand of cards for my plan, and no pesky Light Bow units to get in the way of my heavies. So I was able to get my own line formed up and ready to go without too much difficulty. Badger meanwhile had managed to get his own infantry formed up into a single line across the battlefield. My heavies crashed into his line with the aid of a Double Time card and in 2 turns I had managed to tear a satisfyingly wide hole in the Carthaginian line.

Badger meanwhile managed to get his own Medium (M) and Heavy Infantry across the battlefield, and they were able to even the score a bit on his behalf. As this was happening I was able to bring up my reserves and readjust my forces for the final push against the shattered remants of Himilco's wing of the Carthaginian army which were pressed right back against the edge of the map. This went in; Badger countered; and the next thing I knew we were both at 4 victory banners and chasing just more kill each.

I was feeling quite confident at this point. Unfortunately Badger chose that moment to send his Chariots (CH) and a light infantry unit (one of the ones with a green unit symbol on it) from his right in against my isolated left flank units, which had barely moved throughout the game. Cleverly choosing to attack my Auxilia Infantry (A)- which can't evade- he had tragically little difficulty in sweeping them from the field and winning the day. Yes- it was that damn free banner I'd given Badger at the start of the game which had given him the game in the nick of time! Damn it all! Ouch.

Excited by the game and enthused by his victory Badger was ready and willing to wade into a straight replay- as was I, feeling that I had a point to prove.

The addition of the forgotten Light Bow units meant that the task of forming up my heavies into their battle line was a bit more fiddly, especially since I didn't have such a good hand to play with this time. Mind you, I had 2 extra units with which to cover my left flank, the importance of which was definitely in the forefront of my mind after the manner of Badger's previous victory.

Badger engaged in some skirmishing with his chariots as I was working on my line. This had the happy result that I was 2 victory banners up at little cost by the time I was contemplating the timing of my main assault. I only had 2 decent cards with which to carry this through- as opposed to the 4 or 5 I had in the previous game. I did consider fiddling about a bit while waiting for better cards, but Badger's massed ranks of light units with their missile weapons were in serious danger of whittling my heavies down quite significantly if I hung around too long. Nothing ventured I figured, and charged.

I can't remember quite how things went after that. So long story short: I won. Grins.

1-1

Crimmisos River
By this time quite delighted with the distinct atmosphere and unique tactical challenges of C&C:A relative to M44, Badger wanted more. So off we went to Crimmisos River.

Badger chose to play the Carthaginians again, and to face up to the challenge of getting half of his army across the river.

Previous games having taught me some lessons about striking hard and fast, and not much fancying getting my own heavies tangled up with Badger's own, I swung to the right with my own line again. I quickly made contact with the Carthaginian centre, with little result other than sending some units back across the river. More importantly I suffered rather badly as the Carthaginians battled back against my heavies.

Then the Carthaginian right crashed in on my left flank. Before I knew where I was I had lost 2, maybe 3 units in the carnage and was facing a possible whitewash.

I managed to kill something to avoid utter humiliation. The Carthaginian right wing's attack meanwhile had stalled. So there I was, facing forces across the river on my right that actually outnumbered me, with elements on my left which would crush me from the rear if I tried to stop the river crossing. There was nothing for it: I had to form up into a line ahead (ie. north to south) and crush Hasdrubal's holding force before the Carthaginian left wing could get across the river.

My plan was helped by 2 significant circumstances:
  • Hasdrubal's wing of the Carthaginian army was quite scattered, which maximised the effect of my own attacks.
  • Badger still had 2 wings of his army to consider, whereas my own army was by now largely massed in the centre. Even if Badger was to chose to concentrate his efforts on Hasdrubal's counterattack, he could still be distracted by thoughts of getting reserves in from across the river.
My Syracusans reformed with comforting ease and marched west satisfyingly quickly. As the dust settled after the first few close combats it was clear that my plan had crossed its first hurdle, that of retreiving the dire situation and reawakening my army's hopes of victory. Game on!

Badger's Carthaginians weren't going to go down without a fight, that was for sure. His chariots swooped in and managed to force 2 (yes, 2!) of my units back onto the hills in a single turn. But my Syracusans were not going to let victory disappear from view after the efforts it had taken to bring it back into sight in the first place. I somehow held on against Badger's counterattacks and was able to win. I can't remember for sure, but I strongly suspect that battling back against a Carthaginian attack might've been what gave me my winning victory banner in the end. Grins.

We swapped sides for the final game. I started with just enough left section cards to give me a false sense of security about getting across the river. Unfortunately, managing to get 4 of my units moving and into the river fords pretty much straight off the bat just meant that my army was blocking its own retreats when Badger's attacks went in. So my expectations of a quick river crossing were confounded.

Getting my Carthaginian left wing across the river was never a serious prospect after that. The precise details of what happenend in the centre and on the other wing thereafter escape me, but the upshot of it all was that Badger's Syracusans won. Ouch.

2-2

Memoir'44
Time, we decided, to return to more familiar territory. So off it was to the Pacific Theatre to have another go with the Japanese against the Marines.

Leafing through the rulebook, Badger plumped for 'Matanikau River, Guadalcanal'. He played the Marines against my Japanese.

Looking at all that dug-in infantry and artillery on the Marine's right I decided I wasn't going straight down their barrels. I set on the plan of working my armour round to back up that strong force of infantry on my own centre or right. This was a fiddly and time-consuming manoeuvre, involving- as it did- moving artillery and infantry out of the way to let the armour through. And all the while, that artillery I was so concerned about was raining down constant fire on my forward infantry units.

Badger was much aided in this by the Marines' special rule: basically they can issue an order to 1 additional unit with each card they play (you can find full details on page 6 here should you wish). This meant that Badger was often able to fire with 2 artillery units in the same turn; 3 in the same turn was painfully common too. The result was that even when I did try throwing some infantry forward to gain ground, they were quickly wiped out by a combination of artillery and infantry.

I tried this tactic for 2 games, to no avail. The main difference between the 2 games was that in the first I actually managed to establish a small bridgehead across the Matanikau River in the centre. This didn't survive long enough to be reinforced let alone exploited. Attempts to regain the bridgehead proved futile.

In the 2nd game I tried using that strong force of 5 infantry units on my own right to crush the Marine's open left flank. The result was no better than in the 1st game. In fact the fate of my men was tragically reminiscent of the proverbial 'death in a stream' that will be fondly remembered by any Up Front players among my readers. OUCH!

2-4

By this time Badger was getting too cocky for words, claiming that the scenario was unwinnable by the Japanese. This was the proverbial red rag.

Third time round I realised that I had no choice but to bite the bullet and head straight for those guns I had been so afraid of before. I brought my artillery forward so that one of them was neatly on the section dividing line. We swapped Barrages and engaged in an artillery duel, which resulted in the death of one of my artillery units (that one I'd carefully moved to maximise its usefulness too- dang!). Not an encouraging start I felt. Sheesh.

Fortunately I had a couple of good cards for ordering my infantry forward, and I was quickly able to get 4 infantry units into then across the stream and in among the Marines' positions. This was a very dangerous situation for Badger thanks to the Japanese special rules (page 6 here again), which allowed me to move 2 hexes and close assault; roll an extra dice in close assault with full strength infantry units; and ignore 1 flag each time the Marines attacked. Badger did his best to bring across reinforcements and to stem my rapid advance, but I had card after left section card with which to push my human wave forward, and he had next to nothing.

My lads overran the Marines' rear defences in no time at all, and I quickly won when I managed to exit a 2nd unit off the far board edge. A satisfying vindication and a delightful display of the Japanese in action. I'd won by playing straight to the Japanese strengths instead of getting involved in fiddly manoeuvres that simply ignored those strengths. Still... the night was Badger's in the end.

3-4

Gurns.

Epilogue
Badger's own thoughts about the night's games can be found here. His remark about Rome: Total War is interesting, and speaks well for R:TW and C&C:A both.

Oh, and Badger really isn't exaggerating about his artillery in the M44 game. It was exactly that much of a turkey shoot until I changed my tactics.

Sunday, July 09, 2006

Commands and Colours: Ancients- the Richard Borg engine rumbles on! #2

This time I'm going to look more closely at each of the key rules changes outlined in the previous article.

The battle dice
One hit per unit type in C&C:A means that no unit type is more likely to be hit than any other. This is a significant change from M44, where the breakdown of unit-specific hits are a key feature of how the game models the variation in the vulnerability to fire of different types of unit on the battlefield. The swords are C&C:A's generic hit, just like the grenade in M44. The flag is similarly familiar. The leader hit is a special result which you can only gain if a unit attacking in close combat enjoys the benefits of a leader. Leader hits are also used to determine the chances of a leader being killed.

The new leader result aside, the most striking feature of C&C:A is that no unit type is inherently more vulnerable in close combat against any other unit type, eg. heavy infantry don't immediately hit any harder against light infantry than they do against medium infantry. I have read some complaints about this on the net, and I do think that it is counter-intuituve for players steeped in the comparisons of combat factors traditional in tabletop games and boardgames. I am not at all sure that this is as unrealistic as some have believed at first sight, but the subtleties are beyond me right now.

The Command deck
There are some major changes in the cards, in keeping with the new setting. The major change is that there are only 27 section cards to M44's 40. The range of section cards has also changed, being from 2, 3 or 4 units per section, as opposed to M44's 1, 2, 3 or all. There are still the familiar cards allowing units to be ordered on both flanks or in all sections.

The remainder of the Command deck is broken down into 3 kinds of cards- Troop, Leadership, and Tactic- as opposed to M44's Tactic cards. The Troop cards allow orders to be issued to units of a given troop type- heavy, medium, light or mounted. Leadership cards allow order to be issued to a leader, the unit to which it is attached, and to adjacent units. Tactics cards are the special orders familiar from M44, with a few additions suitable for the ancient setting.

Overall the effect of the redesigned deck is to focus relatively less on where the units are on the battlefield, and relatively more on what kind of units they are, or whether they are formed up into a line or under leadership. Altogether then the new deck is a significant element in generating the flavour of the period and in enforcing a different style of play in response to a specific set of problems. This is an impressive sign of the inherent flexibility of Borg's system.

Oh, and the Tactic card 'I Am Spartacus' qualifies as one of the most entertainingly named cards I have ever seen in a game. I defy anyone to play this card without announcing its name in a certain grandiose tone of voice!

Unit types
These provide a nice cross section of representative types. You have your basic light, medium and heavy infantry and cavalry. In addition you have light slingers and bowmen, auxilia- another class of light infantry, warriors- hard-hitting medium infantry who presumably represent warlike tribesmen, heavy chariots, and elephants (the last 2 are included in the general class of mounted units).

Each unit type has its own distinct capabilities, all of which are neatly summarised on handy reference sheets. All that is except for bowmen and slingers, which are identical in every respect, something which has been commented on here and there on the net. It'd be nice I guess if these units could've been differentiated somehow, but I confess I'm at a bit of a loss as to how this could've been done at the degree of resolution the basic Commands and Colours system allows.

The different unit types' movement rates are neatly differentiated. Medium and heavy foot units slog their way slowly across the battlefield at l hex/turn. Light foot are slightly faster with a move of 2, which enables them easily to keep up with heavy mounted units. Medium and light cavalry move at 3 and 4 hexes/turn respectively. When they move alone, leaders can move a comfortably nippy 3.

Unit types also determine battle dice in close combat (CC). Light units roll a puny 2 dice, which is extra puny if you consider that- the auxilia excepted- light units also can't count sword hits in close combat. Auxilia infantry roll 3 dice. Add in the fact that they can count sword hits and auxilia are fairly respectable 2nd line close combat units with the added bonus of missile fire. Medium and heavy infantry roll 4 and 5 dice respectively. The warrior unit has 4 dice which drop to 3 once it has lost a block. Medium and heavy cavalry roll 3 and 4 dice, while the chariots have 4 dice (3 if battling back). Elephants are covered below.

The dice in C&C:A then are flying thick and fast as compared to M44. Ranged attacks wil be rolling about as many dice as you'll find in the typical M44 attack (see below). Meanwhile most close combats will involve 3 or more dice. Leaving elephants aside for the moment, this can go as high as 7 dice in a single attack if you have heavy infantry attacking with the benefit of the 'Clash of Shields' Tactic card.

I'm no authority on the period, but these 12 units seem to cover all of the obvious bases. They certainly provide one of the main challenges of C&C:A, which is trying to make the most of what initially can be a bewildering variety of troop types. The learning curve here strikes me as being just a bit steeper than it is in M44, but it remains one of complex decisions given by simple elements. Full marks for flavour and gameplay on this score then.

Terrain
As anyone with even a passing knowledge of military history knows, battlefield terrain wasn't of the same importance in the ancient period as it was in WW2. The requirements of moving large formations of infantry in tightly packed ranks meant that ancient commanders typically sought out clear plains over which to face down their enemies. So most of the scenarios are fought across open maps.

All the same, some battles in the ancient period were decided by the impact of terrain. So there are several scenarios in C&C:A in which terrain plays a prominent part. In general, terrain is not your friend the way it is on the WW2 battlefield. Terrain that stops your movement on entry is likely to be more problematical in a game that puts such a high priority on maintaining battlelines. Similarly, I suspect that the battling back rules will place sufficient priority on striking first in close combat that losing the opportunity to battle after entering terrain could prove a more serious tactical burden than it is in M44. Finally, terrain that provides cover against incoming attacks is typically going to restrict outgoing attacks equally.

All of this means that heading as fast as possible for the nearest wood or hill is not necessarily the smart move in C&C:A that it usually is in M44. This seems quite reasonable to me.

Leaders
Leaders are a key element differentiating C&C:A from M44. Leaders are single block elements who can move individually if you wish. They are much more likely to operate attached to units though. Leaders allow the use of certain special Command cards. They also confer certain abilities in combat: to adjacent units- the units may count 1 extra result on each dice (the 'leader' hit) as hits in close combat; or to the unit to which they are attached- leader hits as before; also the unit may ignore a flag result (a retreat, just as in M44), and may also battle again if it advances after combat (otherwise restricted to warriors and mounted units).

So leaders make a unit much more likely to hold its place in your battle line as well as making his section of the battle much more hard hitting. It's easy to see therefore that the correct use of leaders is a key element of the game. This potentially game-winning influence is not without its risks though. Whenever a unit with an attached leader loses 1 or more blocks, there is a chance that the leader might be killed. And if he is killed, then that's a victory medal for your opponent as well as a bit of a kick in the teeth to your battle plans.

Support
Another simple little rule expressing period flavour and enforcing appropriate tactics, the support rule means that a unit with 2 friendly units in adjacent hexes can ignore the first retreat. The effect of this rule on play is to make isolated units and those on your flanks much more likely to break and run. This is particularly important in reducing the effects of missile fire to harassing fire and thus leaving the main basis of your assault to your harder hitting close combat units. All to the good it seems to me.

Ranged attacks
As befits a game whose subject is the clash of arms between massed ranks of fighters, ranged attacks in C&C:A are more limited than they are in M44. In a nutshell, only light units may make ranged attacks; they always roll 1 dice if they moved or 2 dice if they didn't; and ranged attacks can never count sword or leader hits. There are a couple of minor tweaks based on unit type- the main one being that dedicated missile units have a longer range than the rest, but otherwise the ranged attack rules are that simple.

The effect of these rules is to relegate missile fire to harassing attacks best used against the flanks of the enemy. Bringing your missile troops into the centre of the battlefield to make more serious attacks on the enemy line is certainly possible, but the vagaries of cardplay make this an unreliable tactic. And, of course, those pesky missile troops will then usually be in the way of your advancing battleline!

Retreats
Retreats are both potentially more dangerous and less likely in C&C:A than in M44. This is because each unit retreats its full movement allowance per flag instead of the 1 hex/flag of M44. At the same time, the penalty for being unable to retreat remains 1 block per hex that cannot be retreated. The result of this is that highly mobile units like light cavalry can easily be wiped out by a couple of flags forcing them to retreat 8 hexes and bringing them quickly up against their board edge.

At the same time, the rules for leaders and for support mean that most units in a battleline will ignore the first flag, so this tweak to the retreat rules will typically only scupper isolated units, or units on the open flanks, and evasion will often save those units in any case. Otherwise, if units do end up being forced to retreat then your carefully marshalled lines are going to get untidy pretty quickly.

Evasion
Another key rule differentiating C&C:A from M44, the evasion rules represent the often crucial tactic of the period- namely falling back in front of enemy charges that would otherwise utterly destroy your units. In C&C:A light units may always evade. Heavier mounted units can evade units which are heavier/less mobile than themselves, eg. heavy cavalry can evade foot units, heavy chariots or elephants, but not light or medium cavalry.

The evasion rules are quite simple in play: the attacker announces their attack; the defender declares if the target unit will evade; then the battle dice are rolled, but only hits based on unit type are counted- ie. no swords, flags or leader hits; then the evading unit must move 2 hexes back towards its own map edge. Evading is a key manoeuvre to prevent fast cavalry units from being destroyed by retreat results. Evasion is also useful because it prevents the attacker from advancing after combat and maybe getting another attack on your battleline.

Battling back
Another rule utterly definitive of C&C:A's period flavour, this rule allows units that didn't evade and which weren't forced to retreat to battle back against the unit that has just attacked them. There is no limit to how many times a unit can battle back in one turn, thus making it quite possible for prodigious feats of heroism by a lone unit when the dice decide to go to extremes.

There is little that need be said about this really: it makes perfect sense given the scale of the battles and the nature of the combat represented in C&C:A. Some people have complained about the absence of this rule in M44. I believe such criticisms are mistaken. But the absence of such a rule in C&C:A would've completely vitiated the game's claims to authenticity.

Elephants
Thanks perhaps largely to the exploits of Hannibal, elephants are as representative a feature of the ancient period in the popular imagination as are the Roman legions. So I don't think it's excessive to suggest that C&C:A is as liable to be judged by its rules for these unpredictable beasts as for the authenticity of its application of Borg's basic system.

I have to say that C&C:A's elephant rules look splendid. They are fragile- with only 2 blocks- but they ignore all sword hits, plus 1 hit and 1 flag against other mounted units, to represent the way they unnerved horses. In the attack they roll as many dice against a unit as that unit itself rolls in battle, with the addition that they take all sword results and roll them again for possible extra damage. (And yes, this does mean that a single elephant unit could- theoretically at least- roll an infinite number of dice in one battle! Of course the practical limit to that is that no unit has more than 4 blocks.) Then they can advance and battle again. The prospects for carnage against say, heavy infantry, are positively mouth-watering!

On top of that, if an elephant unit is forced to retreat, it immediately rampages. An elephant rampage is a free attack against each and every adjacent unit, friendly or enemy. And as if that wasn't enough, if an elephant unit's retreat is blocked, the blocking units suffer a hit for each hex the elephant unit is unable to retreat. Again, rules that promise moments of great entertainment even if they might prove occasionally very painful.

Saturday, July 08, 2006

Unutterably Fabulous!

"Burning up a sun just to say goodbye..."

So there we go, the last episode of the current series of Doctor Who, with the much anticipated- and somewhat dreaded- departure of Rose. And what an episode!- 45 minutes of rip-snortin', gut-wrenching, action-packed non-stop excitement, easily the best TV I've seen all year.

I mean, just how could you top the last series finale, with that awesome Dalek attack fleet swooping in from space only to be turned to dust by Rose in an attack of TARDIS-induced godhesshood? Well the Daleks versus the Cybermen for the first ever time just couldn't go wrong. Well four Daleks against 5 million Cybermen to be precise. And you know who my money was on? And the trash-talking between the 2 bands of would-be tinpot tyrants was just brilliant too: "This is not war, this is pest control." Sweet joy!

And then there was Rose's departure. Avoiding spoilers all I can say is that this was thrilling and heart-breaking at the same time. Everything that Rose has been throughout 2 series- in herself and to the Doctor- was taken and ramped up to the max with real panache. Fans of the series and of Billie Piper herself can take comfort in the quality of this final story featuring her definitive take on one of the classic SF heroine roles on the silver screen. It was worthy.

Meanwhile there might be some readers out there who haven't yet heard the news about the Doctor's new assistant, who was announced last Wednesday.

Actress Freema Agyeman has a hard act to follow, harder even perhaps than did David Tennant when he took over from Christopher Eccleston. All that I can say as early as this is that I think it was a good choice on the part of the series producers to pick such a contrasting look for the new companion. I wonder where Russell T. Davies will want to take the character?

Well that's Doctor Who for another year. Now we wait. ;)

My little Old World: The Madness of Father Ranulf #2

... Oh, the madness!
The following evening the PC's found themselves in the Scholar's in the Freiburg. The night had barely begun when the same Bartomar who Berthold saw before came hurtling in. He breathlessly explained that Sister Delfholt needed their help. The PC's didn't need telling that something was happening with Father Ranulf, so they followed the messenger out into the dark streets of the city.

Sister Delfholt was waiting for the PC's by the Black Plague Memorial. Quickly she explained that the Temple had receieved the news about the fate of Odo's remains that day- no one could remember them being disposed of at all, certainly no one at the Morrspark. On hearing the news Ranulf went absolutely berserk and ran out into the streets. Staff from the Temple of Shallya gave chase and purused him as far as the Temple of Ulric, at which point they tried in vain to persuade Ranulf to return to the Temple with them. He ran off back the way he'd come instead, and was last seen heading into the Morrspark. Sister Delfholt decided to rely on the PC's because Ranulf seems to trust them.

With Sister Delfholt in tow the PC's headed into the Morrspark. The stench of burnt human flesh from the great pyres of the dead from the siege still hung in the air, and the Morrspark ravens took wing as they were disturbed and circled above, cawing. Father Ranulf was quickly found, near the eastern edge just a few yards south of the shrine to Morr. He was beside himself with agitation and was digging frantically in the soft earth with his bare hands.

The PC's tried persuade Father Ranulf to return to the Temple and the priest began to calm down. Then Sister Delfholt shouted a warning. Looking round to where she was pointing the PC's could see beady yellow eyes watching them from the direction of where the party entered the sewers some 3 months ago. Before anyone had had time to digest this discovery 2 Skaven charged out from among the headstones in the opposite direction and launched attacks against Alane and Berthold.

The pair survived the surprise attacks, and melee was engaged. As Siegfreid prepared to engage he felt something swoosh past his head in the darkness. Fearing missile attacks he tried to force Father Ranulf into cover. Sister Delfholt soon came to his aid, and he moved in to attack as 3 more Skaven came charging out of the night.

Having come straight from his researches at the Collegium Theologica Berthold was armed with nothing more than his knife, so he quickly broke off from the Skaven that had attacked him and moved to Seigfreid's side for support. Meanwhile Alane cast a light spell on her quarterstaff so that her companions could fight the ratmen on equal terms in the darkness. By this time enraged animal shrieks could be heard from where the eyes had been seen before the surprise attack had been launched.

The fight raged on. More of the blowpipe darts that had narrowly missed Seigfried flew around. Two of them hit Sister Delfholt, to no apparent ill-effect. The Skaven pressed their attacks home with some vigour, dealing out serious wounds to Berthold and the Shallyan sister, who was forced to defend herself. The combination of Seigfried's vicious attacks and Alane's magic darts quickly began to tell. The benefits of surprise and the darkness lost and their numbers dwindling, the Skaven faltered, but commanding shrieks from behind kept the survivors from flight. All the same barely a minute after the attack had been launched the last Skaven's nerve gave and it turned and fled into the night.

Leaving Sister Delfholt to attend to her own and Berthold's wounds, Seigfried ran straight for the edge of the Morrspark. Scrambling over the railings he made straight for the sewer entrance he remembered from his previous encounter with the vile ratmen. Crouching down to peer in he heard the scrape of a claw on stone behind him, and was able to twist out of the way of a Skaven sword at the last moment.

Meanwhile Alane too was clambering over the Morrspark railings and hastening to Siegfried's assistance.

Turning to face his attacker Seigfried saw a strangely familiar Skaven bearing down on him in sheer and utter rage. He was the leader who had escaped from the party when they had attacked the Skaven lair months before. The vengeful Skaven was at least as fast and skillful with its blade as was Seigfried with his, but the fight was short and brutal. Almost before the Skaven knew what had hit him, he was wounded, then Siegfried finished him off with a thrust to the arm that opened an artery and emptied the creature of much as half of its blood before it could blink.

Alane arrived just in time to see the Skaven fall. Together the elf and the human peered down into the sewer. Thankfully there were no Skaven in sight. They could see something though, a fleshly lump the size of a large dog. As they stared down wondering what it was, they could hear the sound of claws scraping on stone and a pathetic mewling from the lump. Noting the lump's utter stillness they decided to investigate.

Reaching the thing in the sewer the PC's were horrified to realise that it was a portion of the twisted remains of what had once been Father Odo. The mewling came from a giant rat lying behind the hideous carcass. The rat had a puny tentacle sticking out of its distended stomach. As the PC's looked closer the giant rat's tentacle was reaching out feebly towards the horribly warped remains of the blind priest, which, they saw, had been gnawed away here and there. Some of the bites were fresh enough still to be oozing too. The sight was too much for Seigfried who felt something give way in the depths of his mind.

Utterly unwilling to leave this grotesque... thing in Skaven hands, Alane and Seigfried formed a quick plan. Alane headed off to collect some equipment from the Gilded Swallow while Seigfried stayed to keep watch.

While all this had been happening Berthold had accompanied Sister Delfholt and Father Ranulf back to the Temple of Shallya. This done he too headed to the Gilded Swallow to collect some of his own equipment. He and Alane met up at the inn and together they made their way to back to the Ulricsmund to rejoin Seigfried. They arrived to discover that 2 Skaven had crept up the sewer and- despite Seigfried's best efforts throwing his daggers- had begun slowly to drag the chaos-spawned carcass away.

Our PC's took one look at each other, and headed into the sewer. Unfortunately they had forgotten the lessons of their previous descent into the filthly underworld, and neglected to prepare themselves against the stench. This was to have deadly consequences.

Siegfried went first, closely followed by Alane then Berthold. As our heroes made their way down the narrow ledge they could see that there were 2 more Skaven positioned back down the tunnel, and what turned out to be several giant rats further back. Siegfried charged in against one of the Skaven dragging the carcass away, while Berthold jumped into the sewer channel and waded-in against the other.

As ever, Siegfried had little difficulty in despatching his foe. Berthold too was doing fairly well, eventually forcing it to retreat after crippling its arm. Unfortunately the Skaven were as well prepared and well led as our PC's had been hasty and rash. Another Skaven way back down the sewer tunnel shouted out, and the 5 giant rats- some of them strangely malformed- scurried forward. Meanwhile the 2 Skaven further back down the tunnel kept up a regular slingfire.

This combination of giant rats and slingshots proved deadly in the confined spaces of the sewers. Siegfried went down on top of a giant rat which, pushing its way out from under him, toppled him into the effluent channel. Regaining his feet and hacking into a giant rat, Seigfried was felled by a slingshot. Berthold was preparing to grab his companion and haul him to safety in a prompt retreat, when he too was felled by a slingshot to the temple.

By this time the Skaven Packmaster commanding the rats had moved forward, had used his Things-Catcher to secure the carcass, and was preparing to haul it away. Alone down the sewers and confronted by 2 uncannily accurate Skaven slingers, 5 mutated giant rats, and unknown other Skaven, Alane did the sensible thing- she turned and fled.

Four days later, Seigfried and Berthold's battered bodies having been retrieved by the Watch and tended back to health by the Sisters of Shallya, the PC's were summoned before Commander Schutzmann. Questioned in minute detail by the Middenmarshal about the events in which they had become involved, they left the Watch headquarters realising they had foiled another serious plot. A Skaven plan to undermine Middenheim by infesting the Temple of Shallya with mutated giant rats might not have threatened the unity of the entire Empire as had Liebnitz's scheme, but Schutzmann was certainly relieved to know that the plan had failed, even if only for the moment.

Our PC's, on the other hand- anonymous heroes yet again- no longer felt quite so divinely blessed by the hand of Ulric as they had only scant days before. They had also learned that Liebnitz's evil acts could reach out to haunt them even after his death.

And- to cap it all, Siegfried had missed his romantic assignation!

Related@RD/KA!
The Madness of Father Ranulf
- #2 The madness...
- Index:- My little Old World: Ashes of Middenheim