Commands and Colours: Ancients
Battle of Akragas
We got right down to business with some games of this all-new version of the Borg system with which we are both already so familiar. Starting at the beginning- as you do- we played a couple of games of 'Battle of Akragas' first, with Badger playing the Carthagians against my Syracusans. (You can click on the pictures to see larger versions btw.)
 My strategy in each game was the same: form up my Heavy Infantry (H) into a single line and aim for the Carthaginian left. I had 2 reasons for this:
- it is the weaker wing of the Carthaginian army
- my 2 Auxilia (A) units gave me better reserves on that flank.
Anyhoo, I had a good hand of cards for my plan, and no pesky Light Bow units to get in the way of my heavies. So I was able to get my own line formed up and ready to go without too much difficulty. Badger meanwhile had managed to get his own infantry formed up into a single line across the battlefield. My heavies crashed into his line with the aid of a Double Time card and in 2 turns I had managed to tear a satisfyingly wide hole in the Carthaginian line.
Badger meanwhile managed to get his own Medium (M) and Heavy Infantry across the battlefield, and they were able to even the score a bit on his behalf. As this was happening I was able to bring up my reserves and readjust my forces for the final push against the shattered remants of Himilco's wing of the Carthaginian army which were pressed right back against the edge of the map. This went in; Badger countered; and the next thing I knew we were both at 4 victory banners and chasing just more kill each.
I was feeling quite confident at this point. Unfortunately Badger chose that moment to send his Chariots (CH) and a light infantry unit (one of the ones with a green unit symbol on it) from his right in against my isolated left flank units, which had barely moved throughout the game. Cleverly choosing to attack my Auxilia Infantry (A)- which can't evade- he had tragically little difficulty in sweeping them from the field and winning the day. Yes- it was that damn free banner I'd given Badger at the start of the game which had given him the game in the nick of time! Damn it all! Ouch.
Excited by the game and enthused by his victory Badger was ready and willing to wade into a straight replay- as was I, feeling that I had a point to prove.
The addition of the forgotten Light Bow units meant that the task of forming up my heavies into their battle line was a bit more fiddly, especially since I didn't have such a good hand to play with this time. Mind you, I had 2 extra units with which to cover my left flank, the importance of which was definitely in the forefront of my mind after the manner of Badger's previous victory.
Badger engaged in some skirmishing with his chariots as I was working on my line. This had the happy result that I was 2 victory banners up at little cost by the time I was contemplating the timing of my main assault. I only had 2 decent cards with which to carry this through- as opposed to the 4 or 5 I had in the previous game. I did consider fiddling about a bit while waiting for better cards, but Badger's massed ranks of light units with their missile weapons were in serious danger of whittling my heavies down quite significantly if I hung around too long. Nothing ventured I figured, and charged.
I can't remember quite how things went after that. So long story short: I won. Grins.
1-1
Crimmisos River
By this time quite delighted with the distinct atmosphere and unique tactical challenges of C&C:A relative to M44, Badger wanted more. So off we went to Crimmisos River.
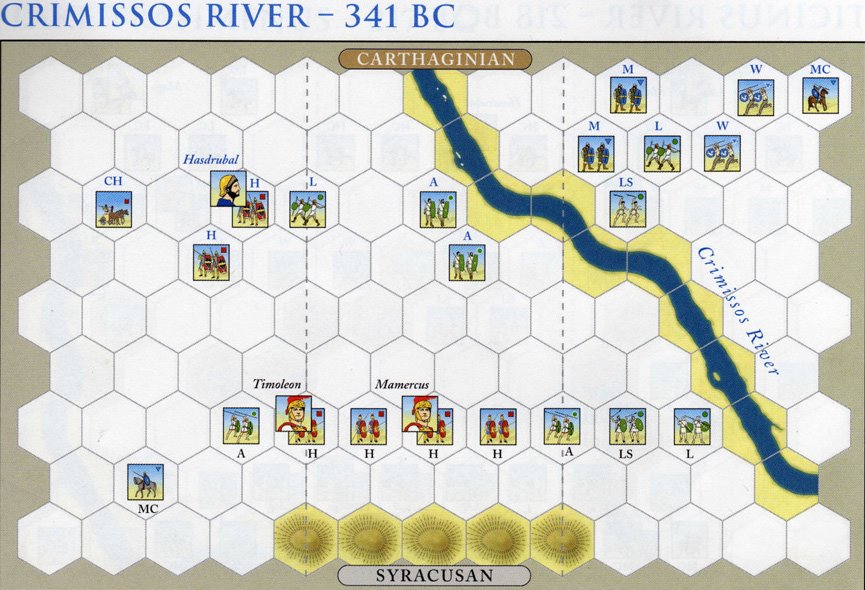 Badger chose to play the Carthaginians again, and to face up to the challenge of getting half of his army across the river.
Previous games having taught me some lessons about striking hard and fast, and not much fancying getting my own heavies tangled up with Badger's own, I swung to the right with my own line again. I quickly made contact with the Carthaginian centre, with little result other than sending some units back across the river. More importantly I suffered rather badly as the Carthaginians battled back against my heavies.
Then the Carthaginian right crashed in on my left flank. Before I knew where I was I had lost 2, maybe 3 units in the carnage and was facing a possible whitewash.
I managed to kill something to avoid utter humiliation. The Carthaginian right wing's attack meanwhile had stalled. So there I was, facing forces across the river on my right that actually outnumbered me, with elements on my left which would crush me from the rear if I tried to stop the river crossing. There was nothing for it: I had to form up into a line ahead (ie. north to south) and crush Hasdrubal's holding force before the Carthaginian left wing could get across the river.
My plan was helped by 2 significant circumstances:
- Hasdrubal's wing of the Carthaginian army was quite scattered, which maximised the effect of my own attacks.
- Badger still had 2 wings of his army to consider, whereas my own army was by now largely massed in the centre. Even if Badger was to chose to concentrate his efforts on Hasdrubal's counterattack, he could still be distracted by thoughts of getting reserves in from across the river.
Badger's Carthaginians weren't going to go down without a fight, that was for sure. His chariots swooped in and managed to force 2 (yes, 2!) of my units back onto the hills in a single turn. But my Syracusans were not going to let victory disappear from view after the efforts it had taken to bring it back into sight in the first place. I somehow held on against Badger's counterattacks and was able to win. I can't remember for sure, but I strongly suspect that battling back against a Carthaginian attack might've been what gave me my winning victory banner in the end. Grins.
We swapped sides for the final game. I started with just enough left section cards to give me a false sense of security about getting across the river. Unfortunately, managing to get 4 of my units moving and into the river fords pretty much straight off the bat just meant that my army was blocking its own retreats when Badger's attacks went in. So my expectations of a quick river crossing were confounded.
Getting my Carthaginian left wing across the river was never a serious prospect after that. The precise details of what happenend in the centre and on the other wing thereafter escape me, but the upshot of it all was that Badger's Syracusans won. Ouch.
2-2
Memoir'44
Time, we decided, to return to more familiar territory. So off it was to the Pacific Theatre to have another go with the Japanese against the Marines.
Leafing through the rulebook, Badger plumped for 'Matanikau River, Guadalcanal'. He played the Marines against my Japanese.
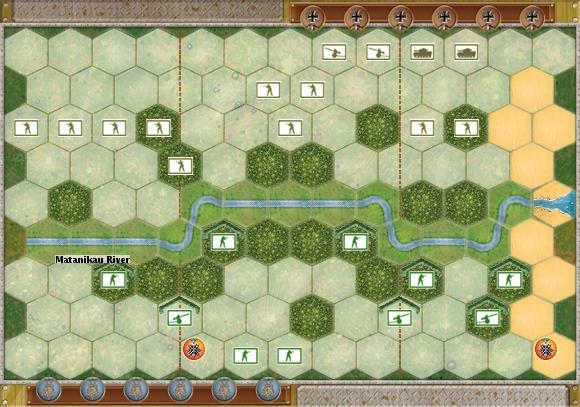 Looking at all that dug-in infantry and artillery on the Marine's right I decided I wasn't going straight down their barrels. I set on the plan of working my armour round to back up that strong force of infantry on my own centre or right. This was a fiddly and time-consuming manoeuvre, involving- as it did- moving artillery and infantry out of the way to let the armour through. And all the while, that artillery I was so concerned about was raining down constant fire on my forward infantry units.
Badger was much aided in this by the Marines' special rule: basically they can issue an order to 1 additional unit with each card they play (you can find full details on page 6 here should you wish). This meant that Badger was often able to fire with 2 artillery units in the same turn; 3 in the same turn was painfully common too. The result was that even when I did try throwing some infantry forward to gain ground, they were quickly wiped out by a combination of artillery and infantry.
I tried this tactic for 2 games, to no avail. The main difference between the 2 games was that in the first I actually managed to establish a small bridgehead across the Matanikau River in the centre. This didn't survive long enough to be reinforced let alone exploited. Attempts to regain the bridgehead proved futile.
In the 2nd game I tried using that strong force of 5 infantry units on my own right to crush the Marine's open left flank. The result was no better than in the 1st game. In fact the fate of my men was tragically reminiscent of the proverbial 'death in a stream' that will be fondly remembered by any Up Front players among my readers. OUCH!
2-4
By this time Badger was getting too cocky for words, claiming that the scenario was unwinnable by the Japanese. This was the proverbial red rag.
Third time round I realised that I had no choice but to bite the bullet and head straight for those guns I had been so afraid of before. I brought my artillery forward so that one of them was neatly on the section dividing line. We swapped Barrages and engaged in an artillery duel, which resulted in the death of one of my artillery units (that one I'd carefully moved to maximise its usefulness too- dang!). Not an encouraging start I felt. Sheesh.
Fortunately I had a couple of good cards for ordering my infantry forward, and I was quickly able to get 4 infantry units into then across the stream and in among the Marines' positions. This was a very dangerous situation for Badger thanks to the Japanese special rules (page 6 here again), which allowed me to move 2 hexes and close assault; roll an extra dice in close assault with full strength infantry units; and ignore 1 flag each time the Marines attacked. Badger did his best to bring across reinforcements and to stem my rapid advance, but I had card after left section card with which to push my human wave forward, and he had next to nothing.
My lads overran the Marines' rear defences in no time at all, and I quickly won when I managed to exit a 2nd unit off the far board edge. A satisfying vindication and a delightful display of the Japanese in action. I'd won by playing straight to the Japanese strengths instead of getting involved in fiddly manoeuvres that simply ignored those strengths. Still... the night was Badger's in the end.
3-4
Gurns.
Epilogue
Badger's own thoughts about the night's games can be found here. His remark about Rome: Total War is interesting, and speaks well for R:TW and C&C:A both.
Oh, and Badger really isn't exaggerating about his artillery in the M44 game. It was exactly that much of a turkey shoot until I changed my tactics.
No comments:
Post a Comment